Christmas Card Challenges #25

Hope you’re having a wonderful weekend! Since it’s Sunday, that means it’s time for a new Christmas Card Challenge!  I’m so happy to be their guest designer for May!

This week, the CCC team has a sketch for you! I hope you’ll have time to play along with the challenge!

Here’s my card:
Supplies: image stamp (Cafe Lucy – Sparkle Creations Rubber Stamps), sentiment stamp (Snow Bunny Lucy set – Sparkle Creations Rubber Stamps), patterned paper (October Afternoon – pink and striped papers; AMuse Studio – red polka dot), Copic markers, Spellbinders circle and Lacey Circle dies, twill tape, buttons, jute twine, Tsukineko Brilliance ink, card base.
and here’s our sketch:

Thanks so much for stopping by! I’ll be back shortly with my DeNami Blog Hop post! 
For all the details on this challenge, and to check out the fantastic cards that the DT created with this week’s sketch, visit the Christmas Card Challenges blog!

Drunken Stampers – One Layer Card

Happy Saturday! It’s time for another Drunken Stampers challenge! This week, we’d like you to make a one layer card!

These are always challenges for me! If you saw my earlier post this week, I made a one layer card for a Kraftin’ Kimmie challenge. I think that one was harder to do than the one I’m about to show you!

If you’ve followed my blog for a while, you might have noticed I color nearly all of my dog images grey/black in honor of my sweet little dachshund, Midnight…and the image on this card is no exception! I love this image from Taylored Expressions, and thought it would be perfect for a one-layer card:

Supplies: image stamp (Taylored Expressions – Animals in Love – Dachshunds), sentiment stamp (AMuse), Copic markers (Dog #1: N2, N4, N6; sweater: R24, R29; Dog #2: E55, E57, E59; sweater: RV21, RV23, RV00; hearts: R22, R24, R20, R21, RV32, RV34, R81, R83; shadows: W0, W1, other: 0), card base.
Normally, I pick the colors of my images based on what patterned paper I’m going to use, but with a one-layer card, I was free to pick whatever colors I wanted!
I hope you’ll have time to join us for this week’s challenge! Be sure to visit the rest of the Drunken Stampers team to see what they’ve created: ChaitaliDonnaElizabethNatSpike, and Steph! Even if you’re a sober stamper (like me and most of the team), we’d love for you to join us for our challenges so you can have fun creating with us!
Thanks so much for stopping by! All of the details on this challenge can be found at the Drunken Stampers blog! See you there!

Kraftin’ Kimmie: One Layer Card?!?!?!

Hi! Thanks for stopping by to look at the card I made for the latest challenge at the Kraftin’ Kimmie blog!

This time, the Krafty Girls challenged us to make a card with ONE layer…and it was definitely a challenge for me! I am sooooooo used to making multiple layer cards and using patterned paper, but I’m glad I challenged myself and made this card!

Normally, I pick my paper and then color the image to match, but I had to go about things differently this time! (You wouldn’t believe the number of tries I threw away before settling on this one. My biggest mistake was trying to use thinner card stock.)

Here’s my card:

Supplies: image stamp (Kraftin’ Kimmie – Gabrielle); white cardstock (PaperTrey Ink), border punch (EK Success/Martha Stewart), twine, pink cardstock, Copic markers (hair – E21, E23, E25, E27, E29; skin – E000, E00, E02, E21, R02; dress – R20, R21, R22, R24, R27, R29; shoes – E29; shadows – W0, W1, W2, W4; other – E13 (tea), opaque white).
It really is one layer…I border punched the bottom of the card front! (The strip of pink that you see is on the inside.) I don’t know if the twine counts as an additional layer, but it’s easy to slip it off if I need to. I just tied it around the front.
Thanks again for stopping by! All of the details for this Kraftin’ Kimmie challenge can be found HERE.

Deconstructed Sketch #51

Hi! Thanks for stopping by to look at my card for Deconstructed Sketch #51! I should have posted it this weekend, but I sometimes have trouble remembering to take photos of my cards after I’ve made them!

Here’s my card:

Supplies: card base, rub-on (Crate Paper), patterned paper (Basic Grey Marjolaine, Memory Box Valise, Echo Park Dots & Stripes), twine (Whisker Graphics), button, border punch (EK Success/Martha Stewart), foam tape, Copic markers (skin: E00, E21, E30, R02; hair: E42, E43, E44; glasses- E47; eyes – YG21, B91; headband/vest – B93, B95, B97, B99; tie – YG21, YG23; skirt – E81, E84; shadows/other – 0, W1, W2), image stamp (The Greeting Farm – Cheeky Geeky)
I ordered this stamp as soon as it was released this month, and I couldn’t wait to color it up for a card! 
Here’s the sketch, for your reference:

All of the details on this challenge can be found HERE.
Thanks so much for stopping by! I have another post to type up, so I’ll be right back!
 

colourQ #135

Happy Tuesday! Welcome back for a new colourQ challenge! I used the colors from this week’s challenge to make a congratulations card for my sister and her family, who just moved into their new house!
Here’s my card:
Supplies: image stamp (Gourmet Rubber Stamps  – House (Lizzie Anne Designs) , border punch (Martha Stewart Crafts), cardstock (Stampin’ UP! – Early Espresso, Pool Party, Bo Bunny – Daffodil Double Dot, Bazzill Basics), patterned paper (October Afternoon), ink (Stampin’ UP! – Chocolate Chip), typed sentiment (font – Traveling Typewriter, dafont.com).
The inside sentiment is “congratulations on your new one!” I still can’t believe I didn’t color the image! It took lots of willpower…LOL!
And here’s our latest colourQ: 
To be considered for this week’s colourQueen, make sure to link your creation at the colourQ blog by Sunday, May 6 at noon Central Time! (Don’t forget to display the challenge colors and link back to the colourQ blog in your entry post.)
Of course, the rest of the colourQ Royal Court have created some gorgeous projects with this week’s colors! You can see them on the colourQ blog or by visiting their personal blogs. (The links are to the right next to the thumbnail of this week’s challenge colors.) 
Thanks so much for stopping by! I can’t wait to see what you’ll create with this week’s colourQ

retro sketches #9

Welcome back! My second post for today is a card created for the latest challenge at retro sketches
I used Paper Smooches’ Sugar Rush set for my card:
Supplies: image and sentiment stamps (Paper Smooches – Sugar Rush), ink (Tsukineko Brilliance), patterned paper (brown polka dot – Jillibean Soup; pink striped paper – Echo Park), embossing folder (Sizzix), Copic markers (fudgesicle – E71, E74, E51, E53; root beer float – E43 (bottom part of glass), E50, E51, E000,(foam) RV25, (straw) C2, C3 (shadows on glass); ice cream cone – R30, R32 (ice cream), E51, E53 (cone); gumdrops/candy – YR16, YR18, R14, R24, G09, G14; foam squares, jute twine, card stock (Stampin’ UP! – Very Vanilla), Distress Stickles (Rock Candy), Glossy Accents.

And, for your reference, here’s the current retro sketch:
Thanks so much for stopping by! If you’d like to play along, there’s still time! This challenge closes at 11:59PM on Thursday, May 3!
Thanks again for stopping by! 

Deconstructed Sketch #49

Hi, crafty friends! Hope you had a great weekend! I have two posts for you today, and the first is for the latest sketch challenge at deconstructingjen! Here’s my card:
Supplies: patterned paper (Memory Box – Minuet), card stock (Stampin’ Up!),  image and sentiment stamps (Taylored Expressions – Royal Digs), embossing folder (Cuttlebug/ProvoCraft), foam squares, Copic markers (flags – R35, R37, R39; door/roof – E81, E84, E87; grass – G21, G24; shadow around castle – BG10; windows – N5, N6; stones – N2, N3, N4; castle walls – W0, W1, W2, W3, W4) ink (Tsukineko Brilliance).

And here’s the sketch used for this card:

Love these sketches! It’s the first time I’ve been able to play along! If you’d like to check out what their Design Team created for this challenge, or want to link up an entry of your own, visit the deconstructingjen blog for all the details!

Thanks for stopping by!

CPS 262

It seems like it has been FOREVER since I’ve been able to play along with a Card Positioning Systems (CPS) challenge! I made this card with the current sketch last night during a crafty chat session:

Supplies: card base, patterned paper (Basic Grey – Konnichiwa), image stamp (Sister Stamps – Ayako), sentiment stamp (My Favorite Things), Copic markers (hair – 110, C4; skin – E00, E11, R02; umbrella – BG10, BG11, BG13, BG18, E31, E33; kimono – R20, R21, R22, BG13, BG18; headband – R20, R21, R22, RV02), foam tape, adhesive pearls.
Now that I’ve completed the first round of Copic certification, I’ll try to do a better job of listing what colors I use for each part of an image! 
Here’s the sketch my card is based on, for your reference:

The deadline for this CPS challenge is Saturday, April 28 at 5pm CST and the sponsor is My Favorite Things.
Thanks for stopping by! Hope you have a wonderful weekend!

Flutter By Wednesday #200

It’s a bittersweet day for me…while we’re celebrating the 200th challenge at Flutter By Wednesday, it’s also the last challenge for me as part of the design team.

Danni (the challenge’s creator, my crafty friend and Flutter By Queen) is moving on to new things, and will not be creating new challenges at Flutter By Wednesday after this one. However, she will be keeping the blog up for inspiration! You can read her full announcement HERE. I know it was not an easy decision for Danni, and I understand and wish her all the best!

It seems like just a few weeks ago that I joined the team, and I’m so glad to have had the opportunity to craft with my FBW Design Team sisters…I’ll be keeping in touch with y’all in blog land, and I hope you all will do the same!

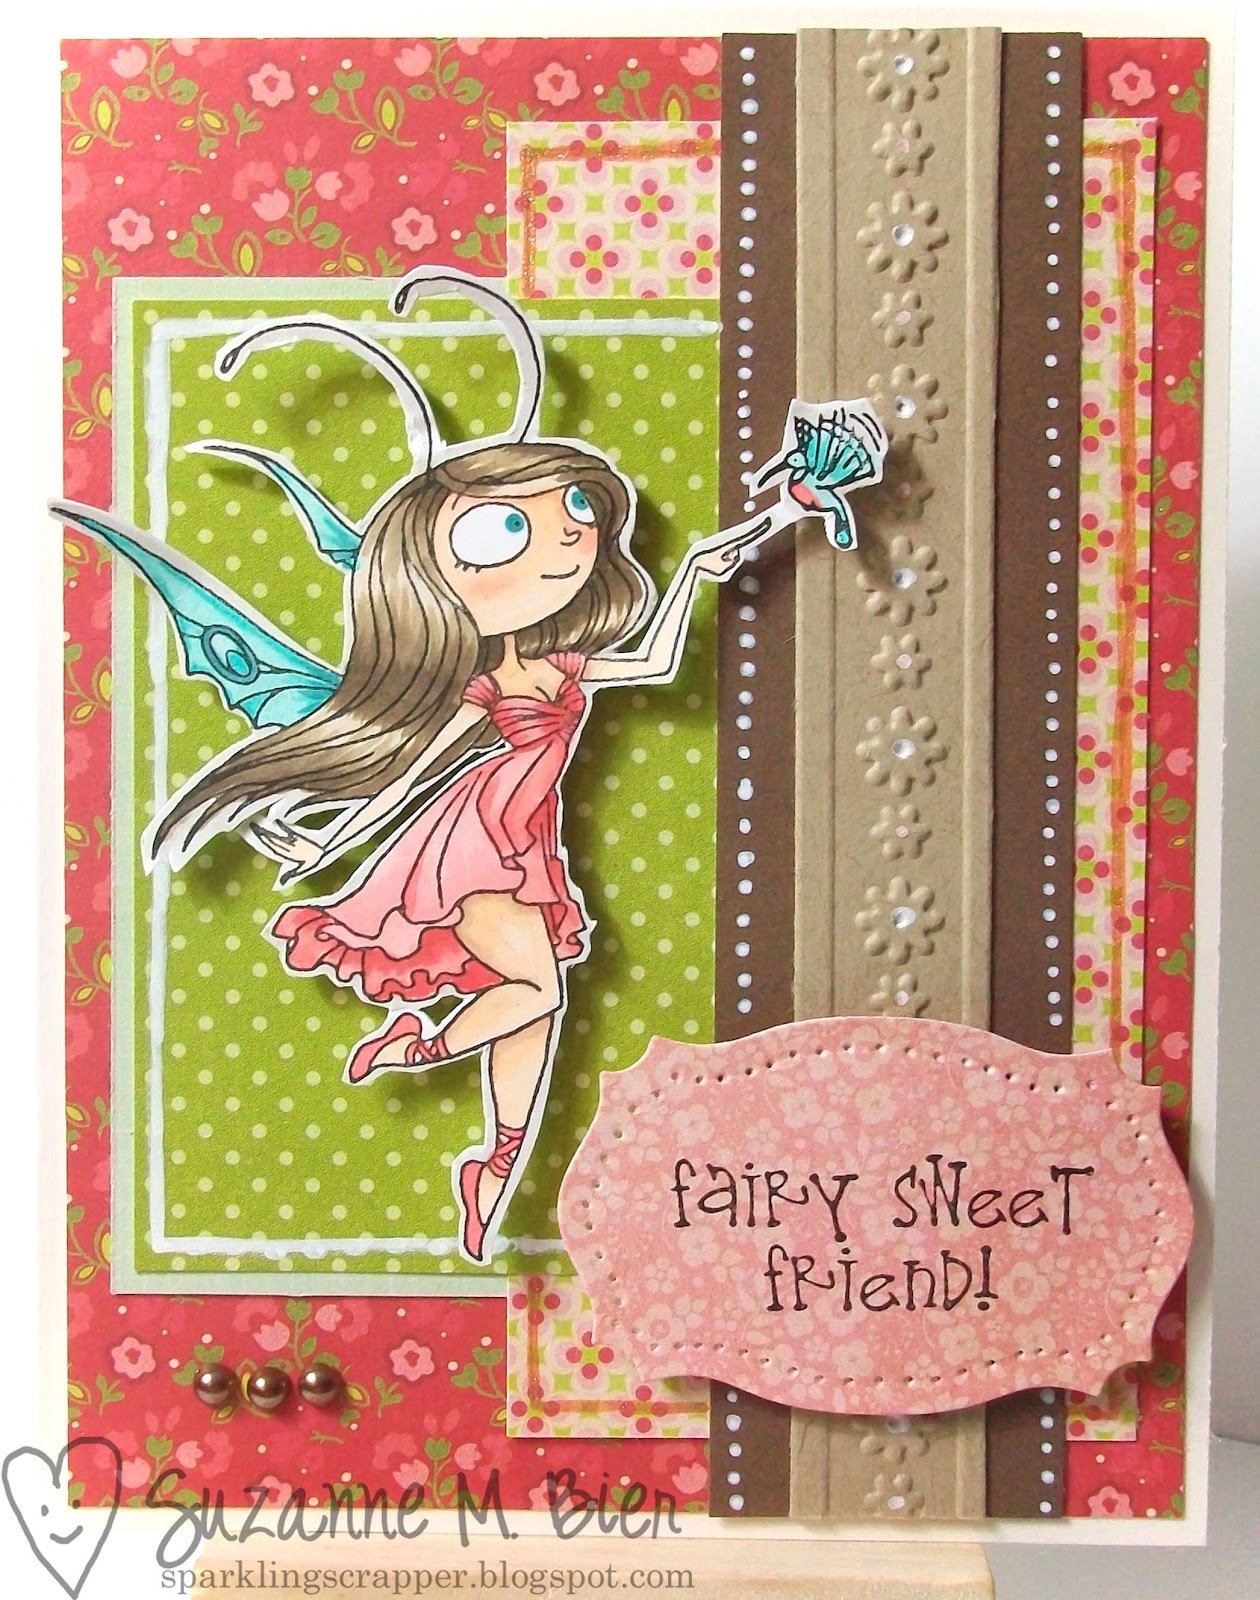
The stamp I used on my card is the first one that I bought when I found out I was joining the FBW DT. I didn’t have that many fairy, butterfly or angel stamps, and I was trying to build up my collection! Since this is my last FBW challenge, I thought it would be a perfect one to use!

Supplies: paper (Echo Park This & That, My Mind’s Eye – pink floral), image and sentiment stamp (Kraftin’ Kimmie –  Isabelle), Copic markers, white opaque marker, copper gel pen, Spellbinders die (Labels 25), foam tape, adhesive pearls, embossing folder, card base.
The inspiration for our challenge this week is a sketch created by Jen Schults
For my card, I rotated the sketch and moved the large accent down instead of leaving it in the center. I thought it would balance better that way (and the shape I stamped the sentiment on looked rather big next to my main image)!

Be sure to discover what the other Flutter By DT Members have created for this week’s challenge: Danni, Anna, Harriet, Karen, Kristie, Leanne, Lynette, Mary, Michelle VP, Nancy, and Peggy!
I hope you’ll play along with us this week! We’d LOVE to see LOTS and LOTS of entries!!
Don’t forget your butterfly, fairy or angel…and I hope to see your entry at the Flutter By Wednesday blog!

colourQ #134

Happy Tuesday! Hope you had a wonderful weekend and are ready for a new colourQ challenge!
Here’s my card:
Supplies: image and sentiment stamps (Unity Stamp Co.), polka dot paper (aMuse Studio), cardstock (Very Vanilla, Calypso Coral, Bravo Burgundy, Pool Party – Stampin’ Up!), adhesive rhinestones (Prima e-line), twill tape, ink (Tsukineko Brilliance), foam tape.
I paper-pieced the image instead of coloring it with Copics…for some reason I have a hard time getting a close marker match for Pool Party, so I used the card stock instead. Pretty simple card overall, after I figured out what colors I wanted on each part!
and here are our colours to inspire you this week:
To be considered for this week’s colourQueen, make sure to link your creation at the colourQ blog by Sunday, April 29 at noon Central Time! (Don’t forget to display the challenge colors and link back to the colourQ blog in your entry post.)
Of course, the rest of the colourQ Royal Court have created some gorgeous projects with this week’s colors! You can see them all on the colourQ blog or by visiting their personal blogs. (The links are to the right next to the thumbnail of this week’s challenge colors.) 
 I can’t wait to see what you’ll create with this week’s colourQ
I’ll be back tomorrow with the final Flutter By Wednesday challenge! Thanks so much for stopping by!